Hatching Newts’ Eggs Manually
In this article we will cover the how and why I found the need of manually hatch newts’ eggs.
N.B. This is a risky procedure, which may result in injuring or killing the larva. Unless there is a real need, it is advisable to let nature do its course, and the larva hatch from the egg naturally.
This article is meant to describe my own experience as hobbyist, I do not have veterinary training and I cannot held reliable should you decide to follow these instructions.
Why hatching the eggs manually?
In normal circumstances, there is no need to hatch eggs manually, as any healthy larva will take the necessary step to hatch from the eggs when it fills ready. During the years I’ve kept Lissotriton italicus, I saw larvae hatching from the eggs at different stages, from when they are barely more than an embryo to completely formed larvae with small forelimbs.
This year I was fortunate enough to receive 11 eggs of Tylototriton ziegleri from a friend, which constituted my biggest challenge in hatching eggs too far. These eggs are laid on land, and roughly 20 days after the deposition, they should hatch, with the larva reaching the water. Of the 11 eggs I receive, 5 continued to develop. Of the 5 developing eggs, I lost 3 larvae while still in the egg. The larvae were fully formed (proper gills, visible eyes, etc.) but suddenly the egg collapsed on itself, and the egg turned cloudy.

How to hatch a newt egg manually.
Why hatching the eggs manually?
What you need for this operation is:
- Sharp knife: I used a hobby knife
- Tweezers: eyebrow tweezers are perfect
- Platform: An item you’ll use to put the egg on, in my cases I used a piece of cork bark I had floating in the tank (the egg was on the smooth underside of the bark)
- Light: arm yourself with a nice desk lamp of similar, you don’t want to do this in shade.
Steps:
Take the egg and place in on the bark. Use the tweezers and the blade to try to push the larva on one side of the egg

Cut a portion of the egg, as big as you can, to allow the larva to exit the egg.

Delicately, use the tweezers to hold and pull the opposite side of the egg to the cut, while use the back of the blade to push the larva out of the cut you just opened.

If everything was done properly, you should have an uninjured larva completely free of the egg.
Move the platform with the larva on top to the water.

Things not to do:
- Cut or puncture the egg without freeing the larva from the egg.
- Mishandle the egg while trying to free the larva from the egg, this could injure the larva.
- Attempt this procedure without a good reason.
Conclusion
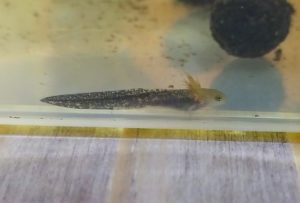
With my first attempt, I did point 1 and 2 of the “Things not to do” above. The result was an injured larva which could not swim properly (jerking movements and landing upside down) due to an injury of the tail which is very visible on the photo. Luckily this injury did not affect the larva, and it grew to be the bigger of the two I have. For the second time I had to do this, I followed the steps above, and this time the procedure lasted much less time, with considerably less stress to me and the larva, which was completely uninjured by the process. The second larva had no injury compared to the first one, fully using its enormous tail to dart across the tank every time I tried to take a picture of it.
While I deeply regret the injury of the first larva, I believe the decision of hatching the egg manually was the right one when faced with the strong possibility of losing the larva as it happened with the other 3 eggs, furthermore, as this species is not aquatic, I hope that the injury will not affect the future life of the larva.