Taking care of eggs, larvae and juveniles
Taking care of eggs
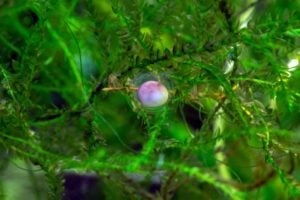
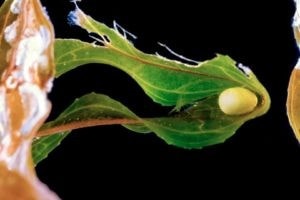
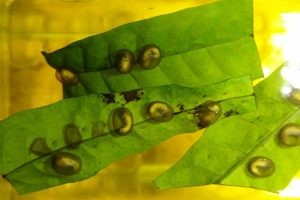
The ultimate goal of many Caudata amphibian keepers is to reproduce their animals. To obtain this result it is obviously necessary to ensure you have at least one pair, guarantee the right breeding parameters and often set a correct brumation/hibernation period. At this point, if everything went well, by checking the aquarium, the first eggs can be found. Depending on the species, these can be deposited in the most disparate places: on trunks, stones, glass, substrate, aquatic plants (here they can also be packed in the leaves), even in very humid places but above the surface of the water.
Common places for spawning
If desired, to facilitate deposition or in any case to increase the spawning surface, we can also insert accessory “devices”, such as plastic strips, sponges, etc. Be careful though, sometimes these materials are mixed with some potentially teratogenic or fatal molecules for eggs and larval stages, sometimes even for adults. The eggs reflect the artificial light well enough, therefore, to better identify them, just help yourself with a normal flashlight. Some species such as Pachytriton sp. show a minimum of parental care, with adults supervising the eggs until hatching but, in principle, once found, it is recommended to move them into separate tanks, so to avoid predation by adults or, if present, by other animals that share the tank such as aquatic gastropods. The episodes of oophagy on the part of the parents vary in frequency depending on the species and they range from entirely exceptional episodes to recurrent. The eggs are extremely delicate so they must be handled with extreme care, or they might be destroyed. Further damage can occur later with the molding of the eggs or the premature exit of the larva, still in the embryonic stage.
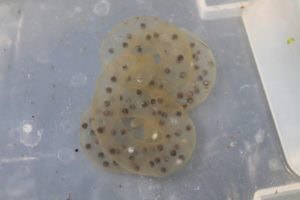
Generally a syringe, without a needle, can be used for collecting the eggs by a very light sucking is performed on the surface of the egg. By gently pulling, it detaches from the substrate and is gently stored in the new tank. This at least as regards small to medium sized eggs. However, some species lay decidedly voluminous eggs that would inevitably end up being damaged when sucking. In this case it is therefore preferable to use a different device (razor blade, stick, spatula, etc.) with which we will delicately detach it from the substrate and recover it with a net. Of course, there are exceptions: Asian Urodela of the Hynobiidae family, lay down real ovigerous bags. In this case the eggs will be more easily transferable, simply move the entire clutch.
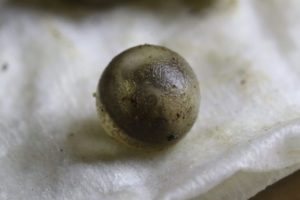
At this point what you have to do is to periodically check the eggs, quickly removing those that gradually become moldy to prevent hyphae from spreading even to healthy ones. Generally the “good” eggs, the fertile ones, have in the very beginning a half white and half black coloring, while the infertile eggs quickly become opaque and white.
To increase the oxygenation of the water it is recommended (but not strictly necessary) to put a small aerator or a pump set to the minimum, especially with rheophilic species, and/or some aquatic plants. The water will have to be changed partially every day, with changes of around 10-20%.
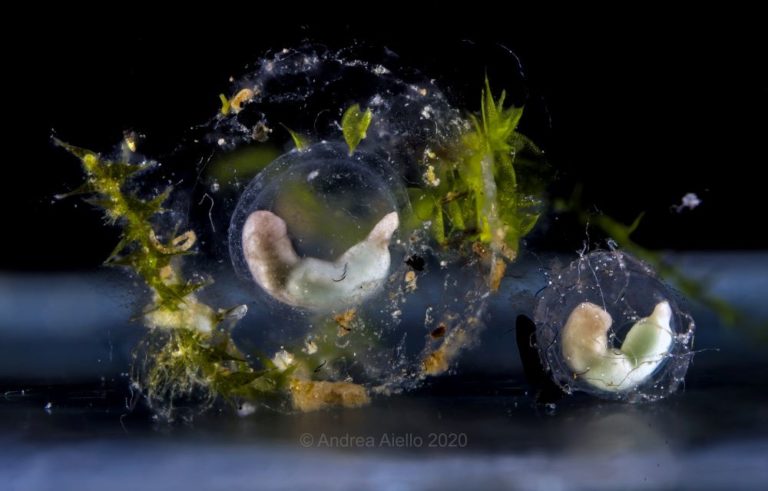
Within a short time, we will already be able to see the developing embryo in all its characteristic phases. Of course in the beginning we will need to help ourselves with a lens or a stereomicroscope, but after about 2-4 days we will already begin to notice the primitive line and consequently the primitive groove. Shortly afterwards the embryo will begin to develop in length assuming the shape of a bean and then a “banana”, until the gill sketches, the barbells and the eyes appear. The larva in formation will begin to move with increasing frequency and intensity, often with sudden jerks and sudden changes of position.
The advice at this point, is to start placing some daphnia in the tank with the eggs. In fact, these will act as a “biological filter” and begin to reproduce, which will be welcome in anticipation for the hatching of the eggs and the larvae starting feeding.
If all goes well within 10-28 days, the first larvae will begin to emerge from the eggs. The timing varies considerably according to various factors: species, pO2, t°, etc. For example, low temperatures will result in an increased development time, while at higher temperatures the times will decrease significantly. Be careful though, some species, especially of colder microclimates (high mountains or high latitude), will not be able to complete the development with excessive temperatures, for example if the water reaches (and exceeds) about 19°C. In other species, high temperatures reduce development and hatching times, but increase the mortality of the larvae.
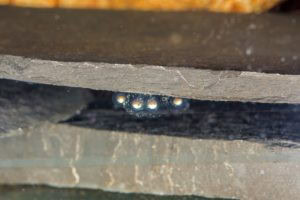
Then there are species such as Ambystoma opacum that lay their eggs on the ground. These will be carefully protected by the female until the time of hatching.
Unusual cases...
Taking care of larvae
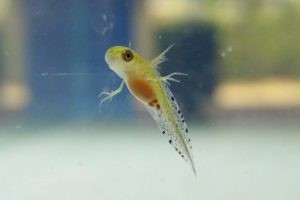
And finally here we are. The first larvae are out. At a very early stage they will almost always stand motionless and lying on their sides but it is perfectly normal. In the first 2-3 days of life, in fact, they will not feed, their support is entirely borne by their egg yolk. It is easily recognized because, already during development, it appears as a white/yellow organ along the entire belly. In this period the best thing to do is to just observe. It is not recommended to stimulate the larvae to make them move, as it causes unnecessary energy expenditure and a load of stress. What should be done instead is to continue changing the water every day for no more than 10-20% of the total.
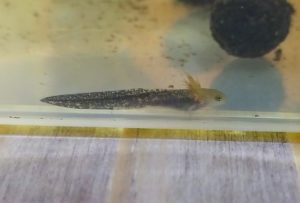
The larvae of stream species will have a significantly different morphology than those of stagnant waters, with a more dorsoventrally compressed body combined with a greater development of the membranes and caudal musculature (to counter the current), less developed gills (in streams and brooks the dissolved oxygen in water is high) and, in some species, more developed barbells or front legs already at birth.
Examples of larvae with different morphology as adaptation to their habitat ...

NB: avoid more substantial water changes. The hatching of the egg always involves a change of environment for the unborn larva since the larvae suddenly goes from being in a relatively protected environment to much different conditions. The environment we have provided to it will have certain chemical-physical characteristics that must be kept as constant as possible. Changes in t°, pH, NO3-, NO2-, etc. can lead to potentially fatal stress. Lethality is inversely proportional to the stage of development of the larva.
After the first 36-72h, the larvae will suddenly turn into insatiable predators. Despite their defenseless and microscopic appearance, they will begin to devour in large quantities everything they manage to swallow. We are therefore talking about strictly carnivorous animals, even if sometimes we hear about breeders who try to feed Urodela larvae with commercial foods which are partly vegetable, but in principle it is not recommended!
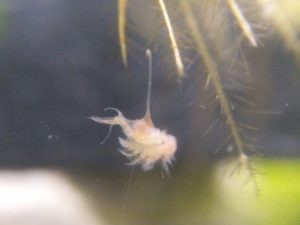
Small sore point … for the first weeks of life the young will feed exclusively on live food. It is absolutely useless to attempt to administer frozen or gel food. So what to feed them with? The best food at the beginning are aquatic microcrustaceans. The best ones being Daphnia sp. and Artemia sp.
NB: I personally recommend daphnia, since they are freshwater animals and, if left in the tank, they will continue to survive and reproduce. In the previous paragraph I had in fact recommended to put an inoculum already during the embryological development period. Artemia are equally valid obviously and in addition, they are often more readily available. Their only real problem is that they are saltwater animals and therefore they will survive a short period if left in the larvae tank. One of the main problems with Urodela larvae is that they often stay on the substrate waiting for a prey to pass in front of their head, they are not “active” hunters, which is why it is better, in my opinion, to use daphnia. Artemia are in fact excellent for fish fry, precisely because they are experienced swimmers and will be able to chase them down to the last individual.
Some unwanted guests...

Attention also to which microcrustaceans we will administer: animals such as ostracodes and copepods, have dimensions similar to those of a daphnia and could be used safely. Their huge problem though is that they can turn from prey into predators, attacking the larvae and killing them, especially in the very first stages of life. With the more grown larvae they can be used, but always sparingly.
So, in summary, in the first 2-3 weeks, we will have to:
- Check the health of the larvae
- Make water changes of no more than 20%
- Enter new food, strictly alive
- Remove any impurities such as excrement, accumulations of exuviae of the microcrustaceans, etc. (help yourself with a syringe)
Already in this short period of time, the larvae will almost double in size and develop the forelimbs. At this point, the food can also be integrated with white worms or vinegar eels. Later, when the lower limbs have fully developed, you can finally start feeding inert food.
An initial indifference to this new food can be completely normal. This is because the larvae will have to get used to feeding following their sense of smell and not just their sight. To facilitate the process it is therefore recommended to use a mixture of live and inert food. In practice: if we use bloodworms, for the first times we will give a mix of live and thawed individuals. In this way they will get used to frozen first, sparing us daily the massive removal of uneaten and left to rot food.
If, in fact, inert food will help with its more immediate availability, it will, on the other hand, increase the cleaning measures of the growth tank. Leaving uneaten food will contribute to the risk of potentially fatal pathologies.
NB: rinse thoroughly any frozen or gel food before administering it. Conservation methods are not always very efficient, risking to cause an accumulation of toxic metabolites and/or harmful substances. By rinsing them thoroughly their charge will drop dramatically, allowing us to use the food we have chosen with greater safety. If in doubt about the quality of the same, do not use it!
So in this last phase the attention will have to focus on:
- Body changes: reabsorption of gills and membranes, strengthening of limbs, moulting.
- Provide a leak-proof lid that always guarantees good ventilation.
- Lower the level of the water column.
- Place several devices for the emerged area.
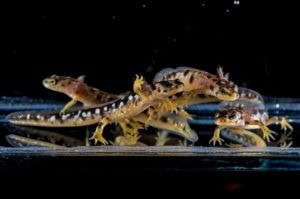
Taking care of juveniles
It’s done, we finally managed to have a miniature version of the adults: one (or more) juveniles.
The problem we will have to face from now on is related to the microhabitat. While the larvae are (obviously) 100% aquatic, depending on the species reproduced by us, we can have totally aquatic, terrestrial or partially aquatic/terrestrial species.
For totally aquatic juveniles, the same rules apply as for larvae undergoing late metamorphosis. The water level can be raised significantly, while maintaining a sufficient amount of emerged areas. We will initially administer food every other day, taking care to diversify as much as possible between earthworms, artemia, bloodworms, gammarids, waterlice, shrimps, pieces of chicken breast. Some also suggest minced meat, but personally I have never used it. Hygiene must be taken care of above all with partial water changes, siphoning of the substrate and control of the chemical values of the water.
For the terrestrial species however, we will have to prepare an additional container, of appropriate size depending on the species and the number of specimens. It does not matter to have fauna boxes or disproportionately large terrariums, which in fact they could adversely affect the health control of juveniles who would be dispersed in an area too large and more difficult to manage. This must be filled with a sufficient quantity of peat, coconut fiber, potting soil also mixed together or, alternatively, a simple wet kitchen paper or sponge can be used.
Numerous hiding places will be set up such as trunks, corks, rocks, bark and whoever has more. If the new terrarium is equipped with a light source, you can also enter some plants. As a feed can give springtails, earthworms of adequate size, whiteworms, micro/mini crickets, waxworms, mealworms, bean weevils, fruitfly, aphids and woodlice. The latter are excellent both as food and as “scavengers”, removing debris and mites. Spiders and ants should be avoided. To avoid finding ourselves without food, we should arm ourselves with some extra containers where we can even temporarily raise food. The terrarium should be sufficiently moist but never drenched, therefore 1-3 sprays per day are recommended. In any case we will check daily. Given the size of the juveniles, in fact, dehydration occurs much faster than for an adult animal, with a consequent increase in the danger of death.
The shelters will therefore also serve as moisture retention niches. We will also go daily to check the substrate’s hygiene status, removing feces, any food waste and paying close attention to the presence of mites. Generally someone is always present, but if they increase in density they could even go on preying on the youth. The change of substrate will be carried out periodically, according to temperature, number of housed specimens and type of the same. In general, it should be replaced every 2-12 months.
For semi-aquatic / semi-aquatic, we will simply use a tank large enough to prepare a set-up that includes both of the above types.
About the Author...
Andrea Aiello, born in Florence in 1988, immediately gained a deep interest and fascination for nature and scientific-medical subjects. In 2012 he graduated in Biological Sciences from the University of Florence. He is currently pursuing a degree in Medicine and Surgery at the University of Florence.
From 2013 to 2018 he is a member of the Paolo Malenotti Foundation.
He has been breeding Caudata amphibians since 2008, mainly interested in Middle Eastern species (especially of the genus Neurergus) as well as the Plethodontidae family.
He is also fond of Orchids and Carnivorous Plants, of which he has a modest collection, which began in 2005. Other passions include Photography, Fishing, Herping, Trekking and Hiking more generally.
“Once I am settled, I would like to dedicate part of the new home to the breeding of other species of Urodeles and to the cultivation of tropical plants in greenhouses. At that point I would be delighted to be able to start keeping some Anura amphibians.”